Wait! Before you manually tune with these directions, do you have autotune on your device?
All our newest mainline controllers (gas and liquid) have a very quick and easy autotune built-in. For Alicat devices with part numbers beginning with MC or LC, and running firmware version 10v11 or higher, autotuning (labeled Optimize Control) is a quick and easy way to improve your process control.
You’ll find it from the home screen by choosing MENU > SETUP > CONTROL. If you see OPTIMIZE CONTROL on the menu, you can use autotune to optimize your control valve’s response to the current conditions.
See your device’s user manual for directions on how to use the autotuning feature.
PID tuning (PD/PDF and PD2I) tutorial
Closed loop control algorithms are used to adjust valve responsiveness within Alicat flow or pressure controllers. Modifying the variables within these algorithms allows the user to control how fast a controller reaches a setpoint as well as control stability.
In this article, we will explain some of the theory behind valve tuning and give tips on tuning your own Alicat device.
When to tune your controller
Before shipping, each controller is tuned for optimal valve performance at the indicated process conditions. For example, if a controller is ordered to flow air at 25 SCCM, then it will be tuned with that in mind. That means if you use your controller for exactly what you configured it for, the valve tuning and therefore control stability should be solid.
However, if process conditions change, for example, if you decide to flow hydrogen instead of air or if you modify the inlet/outlet pressure, you may need to retune your device.
Valve tuning using PD/PDF and PD2I control algorithms
There are two control algorithms used to tune Alicat controllers:
- PD/PDF tuning typically for single valve controllers
- PD2I tuning typically for dual valve controllers (MCDs and PCDs)
Note: You can view your selected control loop by going to MENU > CONTROL > CONTROL LOOP > LOOP TYPE on the front panel of your Alicat controller.
The PID control algorithm is composed of three terms each playing their part to minimize the error between the setpoint and the measured process variable. They are defined as follows:
- Proportional (P): The proportional term decreases the error between the setpoint and reading.
- Derivative (D): The derivative variable dampens the rate of change of the valve position.
- Integral (I): The integral variable takes into account the sum of previous errors.
Note: You can view the current settings for your P, D, and I variables by going to MENU > CONTROL > CONTROL LOOP on the front panel of your Alicat controller.
The PD/PDF Algorithm
The PD/PDF algorithm provides a simplified user interface. It only requires the user to work with two variables: P and D. This substantially cuts the user’s level of difficulty.
There are a couple of telltale problems indicating a device is in need of valve tuning:
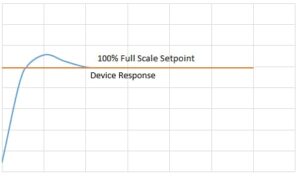
- You notice oscillation around the setpoint or the control response is unstable.
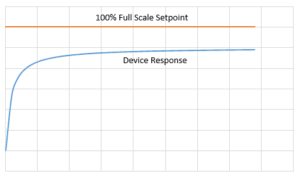
- Your controller takes too long to get to the setpoint or never achieves the setpoint, but settles to a flow rate or pressure below the setpoint value.
Below are instructions on tuning your device to solve these problems.
Step-by-step instructions
Serial commands and FlowVision
- Ensure that your controller is connected serially.
- These instructions assume a Unit ID of A. If your controller’s Unit ID is not A, substitute the correct letter of your Unit ID. If your controller is in streaming mode, do not type the leading ‘a’ in the instructions below.
- In this tutorial, we will be using the [Unit ID]S# command to give the controller setpoints. In addition, we will assume a 2 SLPM full scale mass flow controller (MC-2SLPM-D). Therefore, our command for a full scale setpoint will be AS2. Likewise, the commands for 1 SLPM or 0.4 SLPM would be AS1 and AS0.4, respectively. Replace the setpoint value with what your setup requires.
- Set PID loop type to PD/PDF.
- There are multiple ways to perform this action. The simplest is from the front panel of your Alicat device.
- From the front panel of your device, go to: MENU > CONTROL > ADV CONTROL > LOOP SETUP > LOOP TYPE. This is the menu map for Alicat’s latest firmware. If you find your menu is different, please consult your manual or one of our application engineers.
- Select “PD/PDF Control” and press “SET”.
- To perform this serially use the Loop Control Algorithm command. To query which algorithm is being used, use ALCA. A value of 1 will return for PD/PDF, and a value of 2 will return for PD²I.
- To set the algorithm to PD/PDF use the command ALCA 1. The device will respond with A 1.
- To set the algorithm to PD²I use the command ALCA 2. The device will respond with A 2.
- There are multiple ways to perform this action. The simplest is from the front panel of your Alicat device.
- Set all PID variables.
- Record your controller’s existing PID settings.
- Read the current P value: type ar21.
- Read the current D value: type ar22.
- Set the P variable in register 21 to 100: type aw21=100.
- Set the D variable in register 22 to 5000: type aw22=5000.
- Record your controller’s existing PID settings.
- Determine the best P value.
- Ensure that your controller is connected to a gas source of the appropriate pressure and flow capacity. Start with a 0 setpoint: type AS0.
- Command a 5%, 25%, 50%, and 100% setpoint (AS0.1, AS0.5, AS1, AS2), and observe the flow readings.
- If there is no overshoot, add 100 to the P variable in register 21: type AW21=[old value+100]. Start again at step a. Once you observe a small amount of overshoot, continue to step d.
- If there is un-damped oscillation, subtract 10 from the P variable in register 21: type AW21=[old value-10]. Repeat this until the oscillations die away after a change in setpoint. If it does not improve after 5 iterations, jump to section 5 and start increasing the D variable.
- Determine the best D value.
- Ensure that your controller is still connected as in step 4 and start from a 0 setpoint: type AS0.
- Command a 5%, 25%, 50%, and 100% setpoint (AS0.1, AS0.5, AS1, AS2), and observe the flow readings.
- If you are experiencing overshoot and oscillations, increase D 1000 at a time: type AW22=[old value+1000]. Start again at step a.
- If the flow reading matches your setpoint and readings are stable, continue to the next step.
- Validate the final tuning.
- To properly balance off speed of response and stability, it may be necessary to repeat steps 4 and 5 above several times.
- If you cannot dampen out oscillations through tuning, there may be mechanical interference from other parts of your system.
This can be done through FlowVision 2.0 by entering the new values into the respective boxes on the instrument panel.
Front panel and oscilloscope
- Set PID loop type to PD/PDF.
- From the front panel of your device, go to: MENU > CONTROL > CONTROL LOOP > LOOP TYPE. This is the menu map for Alicat’s latest firmware. If you find your menu is different, please consult your manual or one of our application engineers.
- Select “PD/PDF Control” and press “SET”.
- Set your PID variables to P=100 and D=5000.
- Go to: MENU > CONTROL > CONTROL LOOP. Before you make any changes to your P and D values, be sure to record your controller’s existing settings.
- Select “P Gain”, change your P gain to 100, and press “SET”
- Select “D Gain”, change your D gain to 5000, and press “SET”
- Determine the best P value.
- Ensure that your controller is connected to a gas source of the appropriate pressure and flow capacity. Start with a 0 setpoint.
- Command a 5%, 25%, 50%, and 100% setpoint, and observe the flow readings.
- If there is no overshoot, add 100 to the P variable. Start again at step a. Once you observe a small amount of overshoot, continue to step d.
- If there is un-damped oscillation, subtract 10 from the P variable. Repeat this until the oscillations die away after a change in setpoint. If it does not improve after 5 iterations, jump to section 4 and start increasing the D variable.
- Determine the best D value.
- Ensure that your controller is still connected as in step 4 and start from a 0 setpoint.
- Command a 5%, 25%, 50%, and 100% setpoint, and observe the flow readings.
- If you are experiencing overshoot and oscillations, increase D 1000 at a time. Start again at step a.
- If the flow reading matches your setpoint and readings are stable, continue to the next step.
- Validate the final tuning.
- To properly balance off the speed of response and stability, it may be necessary to repeat steps 3 and 4 above several times.
- If you cannot dampen out oscillations through tuning, there may be mechanical interference from other parts of your system.
The PD2I Algorithm
The PD2I algorithm was developed at Alicat Scientific for the express purpose of obtaining the highest possible performance in pressure control applications. It is also applicable to many flow control applications. As it utilizes proprietary predictive functions, this algorithm does not behave like a standard PID routine. Fortunately, PD2I tuning is simple if you follow a few simple guidelines:
Step-by-step instructions
Serial commands and FlowVision
- Ensure that your controller is connected serially.
- These instructions assume a Unit ID of A. If your controller’s Unit ID is not A, substitute the correct letter of your Unit ID. If your controller is in streaming mode, do not type the leading ‘a’ in the instructions below.
- In this tutorial, we will be using the [Unit ID]S# command to give the controller setpoints. In addition, we will assume a 2 SLPM full scale mass flow controller (MC-2SLPM-D). Therefore, our command for a full scale setpoint will be AS2. Likewise, the commands for 1 SLPM or 0.4 SLPM would be AS1 and AS0.4, respectively. Replace the setpoint value with what your setup requires.
- Set PID loop type to PD2I.
- There are multiple ways to perform this action. The simplest is from the front panel of your Alicat device.
- From the front panel of your device, go to: MENU > CONTROL > ADV CONTROL > LOOP SETUP > LOOP TYPE. This is the menu map for Alicat’s latest firmware. If you find your menu is different, please consult your manual or one of our application engineers.
- Select “PD2I Control” and press “SET”.
- To perform this serially use the Loop Control Algorithm command. To query which algorithm is being used, use ALCA. A value of 1 will return for PD/PDF, and a value of 2 will return for PD²I.
- To set the algorithm to PD/PDF use the command ALCA 1. The device will respond with A 1.
- To set the algorithm to PD²I use the command ALCA 2. The device will respond with A 2.
- There are multiple ways to perform this action. The simplest is from the front panel of your Alicat device.
- Set all PID variables to P=200, D=10, I=100.
- Record your controller’s existing PID settings.
- Read the current P value: type ar21.
- Read the current D value: type ar22.
- Read the current I value: type ar23.
- Set the P variable in register 21 to 200: type aw21=200.
- Set the D variable in register 22 to 10: type aw22=10.
- Set the I variable in register 23 to 100: type aw23=100.
- Record your controller’s existing PID settings.
- Determine the best P value.
- Ensure that your controller is connected to a gas source of the appropriate pressure and flow capacity. Start with a 0 setpoint: type AS0.
- Command a 25%, 75%, and 100% setpoint (AS0.5, AS1.5, AS2), and observe the flow readings.
- If you observe any oscillations, increase P by 100: type AW21=[old value+100]. Start again at step a. If you find that increasing P increases the oscillations, skip this step and move on to step d.
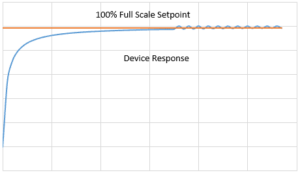
- If there is un-damped oscillation, subtract 10 from the P variable in register 21: type AW21=[old value-10]. Repeat this step until the flow rate approaches the setpoint with no overshoot or oscillations. Do not worry about the speed of convergence. At this point, the tuning might look like this.
- Determine the best I value.
- Ensure that your controller is still connected as in step 4 and start from a 0 setpoint: type AS0.
- Command a 25%, 75%, and 100% setpoint (AS0.5, AS1.5, AS2), and observe the flow readings.
- To increase the speed of convergence, add 50 to the I variable in register 23: type AW23=[old value+50]. Start again at step a.
- If, after increasing I, you observe overshooting and oscillations, return I to the previous value.
- If the flow reading matches your setpoint and converges at a speed you as happy with, continue to the next step.
- Determine the best D value.
- For nearly every tuning scenario, the optimal D value is 10 and does not require any change. If your current tuning is sufficient, move on to step 7.
- Ensure that your controller is still connected as in step 4 and start from a 0 setpoint: type AS0.
- Command a 25%, 75%, and 100% setpoint (AS0.5, AS1.5, AS2), and observe the flow readings.
- If you observe oscillation around the setpoint, add 10 to the D variable in register 22: type AW22=[old value+10]. Start again at step b. If flow readings are stable, continue to step 7. Do not exceed a value of 50 in the D register. If it looks like you would need to, return to step 4, and start again.
- Validate the final tuning.
- To properly balance off the speed of response and stability, it may be necessary to repeat steps 4, 5, and 6 above several times.
- If you cannot dampen out oscillations through tuning, there may be mechanical interference from other parts of your system.
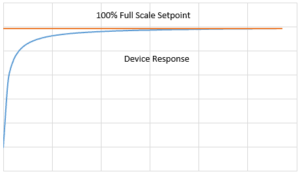
- Your final tuning should look something like this.
Front panel and oscilloscope
- Set PID loop type to PD2I.
- From the front panel of your device, go to: MENU > CONTROL > CONTROL LOOP > LOOP TYPE. This is the menu map for Alicat’s latest firmware. If you find your menu is different, please consult your manual or one of our application engineers.
- Select “PD2I Control” and press “SET”.
- Set your PID variables to P=200, D=10, I=100.
- Go to: MENU > CONTROL > CONTROL LOOP. Before you make any changes to your P and D values, be sure to record your controller’s existing settings.
- Select “P Gain”, change your P gain to 200, and press “SET”.
- In a similar fashion, change your D gain to 10, and your I gain to 100.
- Determine the best P value.
- Ensure that your controller is connected to a gas source of the appropriate pressure and flow capacity. Start with a 0 setpoint.
- Command a 25%, 75%, and 100% setpoint and observe the flow readings.
- If you observe any oscillations, increase P by 100. Start again at step a. If you find that increasing P increases the oscillations, skip this step and move on to step d.
- If there is un-damped oscillation, subtract 10 from the P. Repeat this step until the flow rate approaches the setpoint with no overshoot or oscillations. Do not worry about the speed of convergence. At this point, the tuning might look like this.
- Determine the best I value.
- Ensure that your is still connected as in step 3 and start from a 0 setpoint.
- Command a 25%, 75%, and 100% setpoint, and observe the flow readings.
- To increase the speed of convergence, add 50 to the I variable. Start again at step a.
- If, after increasing I, you observe overshooting and oscillations, return I to the previous value.
- If the flow reading matches your setpoint and converges at a speed you as happy with, continue to the next step.
- Determine the best D value.
- For nearly every tuning scenario, the optimal D value is 10 and does not require any change. If your current tuning is sufficient, move on to step 6.
- Ensure that your controller is still connected as in step 4 and start from a 0 setpoint.
- Command a 25%, 75%, and 100% setpoint, and observe the flow readings.
- If you observe oscillation around the setpoint, add 10 to the D variable. Start again at step b. If flow readings are stable, continue to step 6. Do not exceed a value of 50 in the D register. If it looks like you would need to, return to step 3, and start again.
- Validate the final tuning.
- To properly balance off the speed of response and stability, it may be necessary to repeat steps 3, 4, and 5 above several times.
- If you cannot dampen out oscillations through tuning, there may be mechanical interference from other parts of your system.
- Your final tuning should look something like this.


